6.4. Setting up DNS
DNS (Domain Name System) is responsible for translating Internet names (such as www.yourdomain.com) into IP addresses (such as 192.168.1.10). You can think of it like a telephone book for the Internet. Organizations publish DNS records to tell the rest of the world how to reach them.
The DNS is comprised of zones. A zone is either a domain name or an IP network for which a given server is authoritative. When you register a domain you define one or more nameservers -- these are the nameservers which are advertised to the Internet as having authoritative information for the domain.
DNS supports two types of zones: forward, which converts names to addresses, and reverse, which converts addresses to names.
Another core concept in DNS is a record. There are several different types of records, some of which are summarized in Table 6-1 below.
Table 6-1. DNS Record Types
| A | Address | Publishes names-to-addresses |
| PTR | PoinTeR | Publishes addresses-to-names |
| NS | Name Server | Publishes authoritative nameserver information. |
| MX | Mail eXchanger | Publishes mail server information. |
Under normal circumstances you will need to maintain your own DNS server if you are hosting any domains for e-mail or web. The rest of this section demonstrates creating forward and reverse DNS zones.
By the end of this section the reader will have created one forward and one reverse DNS zone.
6.4.1. Setting up a Forward DNS Zone
Log into the Guardian Digital WebTool, click the Services menu, then choose the Domain Name Service link. From the Modules menu, choose Master Zone Listing, and click the Create Master Zone button. You will then be presented with the screen shown in Figure 6-5.
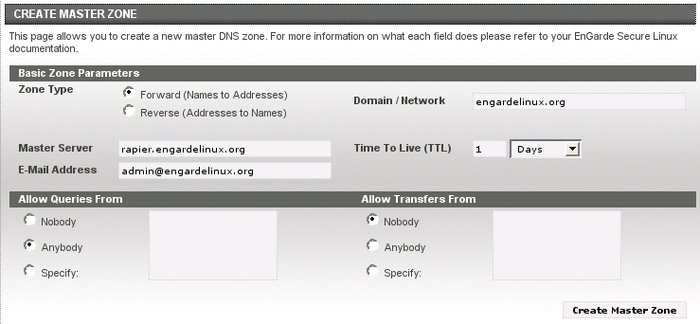
Fill out the information on this page using the suggestions below:
Zone Type
Leave this set to Forward.
Domain Name / Network
Enter the name of the domain you want to create the zone for.
Master Server
Leave this set to the default value unless you have a reason to change it.
Email Address
Enter an administrative e-mail address in this field.
Time To Live (TTL)
This is the amount of time results from your server are allowed to be cached by remote servers. Leave this set to the default unless you have a reason to change it.
Allow Queries From...
Leave this set to Anybody.
Allow Transfers From...
Leave this set to Nobody unless you intend to set up a slave DNS server, in which case choose Specify and enter the slave server's IP address.
When done click the Create Master Zone button. Your zone will be created and you will be taken back to the previous screen where you will see your new domain in the Forward Zones section. Click the name to edit it.
For more information on adding Address, Name Alias, Name Server, and Mail Server records please refer to the EnGarde Secure Professional User Manual.
6.4.2. Setting up a Reverse DNS Zone
Setting up a reverse zone is just as easy as setting up a forward zone. Refer to Figure 6-5 and fill out the information on this page using the suggestions below.
Zone Type
Set this to Reverse.
Domain Name / Network
Enter the network you want to create the zone for. For example, if your network is 192.168.1.0/24, enter 192.168.1.0. Under most circumstances the value you enter in this box is the same as your IP network address.
Master Server
Leave this set to the default value unless you have a reason to change it.
Email Address
Enter an administrative e-mail address in this field.
Time To Live (TTL)
This is the amount of time results from your server are allowed to be cached by remote servers. Leave this set to the default unless you have a reason to change it.
Allow Queries From...
Leave this to Anybody.
Allow Transfers From...
Leave this set to Nobody unless you intend to set up a slave DNS server, in which case choose Specify and enter the slave server's IP address.
When done click the Create Master Zone button. Your zone will be created and you will be taken back to the previous screen where you will see your new domain in the Reverse Zones section. Click on it to edit it.
For more information on adding Address, Name Alias, Name Server, and Mail Server records please refer to the EnGarde Secure Professional User Manual.